
Why Vinyl Wrapping Auto is Revolutionizing Vehicle Customization
Vinyl wrapping auto is the process of applying a thin, adhesive-backed plastic film to a vehicle’s exterior. It’s a popular way to change a car’s color, add custom graphics, or protect the original paint. Unlike repainting, vinyl wraps are fully reversible, cost-effective, and can last 5-7 years with proper care.
Quick Facts About Vinyl Wrapping Auto:
- Material: Polyvinylchloride (PVC) polymer with UV-resistant additives.
- Cost: Comparable to paint jobs when done professionally, but cheaper as a DIY project.
- Durability: Lasts 3-10 years depending on quality, climate, and maintenance.
- Protection: Shields original paint from UV damage, scratches, and minor dings.
- Reversibility: Can be removed without damaging factory paint.
- Application: Requires basic tools, a clean workspace, and patience for DIY success.
With so many cars on the road in monochromatic shades, it’s no surprise that drivers are seeking ways to stand out. Vinyl wrapping offers a practical and versatile solution for both personal customization and business branding.
You can choose from a vast array of finishes, including matte, gloss, satin, chrome, carbon fiber, or even color-changing effects. If you change your mind or decide to sell your vehicle, the wrap peels off cleanly, revealing the protected original paint underneath.
While a professional wrap can be a significant investment, modern air-release technology and improved adhesives have made DIY full car wraps more achievable than ever. This guide walks you through the entire process—from understanding the material to application and maintenance—to help you achieve professional-looking results.

Understanding Vinyl Car Wraps: More Than Just a Sticker
At its core, a vinyl wrap is a specialized plastic film made from polyvinylchloride (PVC) polymer. It’s engineered with additives that provide flexibility, durability, and resistance to the elements. These additives also enable the vibrant colors and unique finishes that make vinyl wrapping auto so appealing. The film itself is often just 2 mil thick, yet it’s remarkably strong.
Modern high-quality wraps feature air-release channels in the adhesive layer. These tiny, invisible channels allow trapped air to escape, making application smoother and helping to achieve a flawless finish. This innovation has made vinyl wrapping auto more accessible for DIY enthusiasts.
When shopping for vinyl, you’ll encounter terms like “cast” and “calendered.” Cast vinyl is the premium option, created by a process that results in a thin, flexible film that conforms beautifully to complex curves and offers superior longevity (5-7 years or more). Calendered vinyl is thicker and less conformable, making it suitable for flat surfaces but less ideal for intricate body lines. For a more comprehensive look, explore our page on What is a Vehicle Wrap?.
Beyond aesthetics, vinyl wraps are practical. The film acts as a protective shield over your original paint, guarding against minor scratches, stone chips, and UV radiation. This preserves your car’s factory finish, which is a significant advantage for resale value. Learn more about these practical advantages on our page covering the Benefits of a Car Wrap.

The Great Debate: Vinyl Wrap vs. Repainting
When changing your car’s appearance, you’ll face the choice between vinyl wrapping auto and a traditional paint job. Both deliver stunning results, but they differ in process, cost, and long-term implications.
Here’s a breakdown of the key differences:
| Feature | Vinyl Wrap | Repainting |
|---|---|---|
| Cost | Often less expensive than custom paint, especially for unique finishes. Professional wraps may be comparable to quality paint jobs. | Can be expensive, particularly for high-quality finishes or custom colors. |
| Installation Time | Typically 2-5 days for a professional wrap. | Can take weeks for sanding, priming, painting, and curing. |
| Protection | Acts as a protective barrier against UV damage, minor scratches, and stone chips. | Offers no additional protection beyond the new paint layer itself. |
| Customization Options | Virtually unlimited colors and textures, including gloss, matte, satin, chrome, and custom graphics. Fully reversible. | Limited to available paint colors. Custom effects are complex and expensive. Permanent modification. |
| Durability | High-quality wraps last 5-7 years, sometimes longer with proper care. | Can last many years but is susceptible to chipping, scratching, and fading. |
| Reversibility | Fully reversible. Can be removed without damaging the original factory paint, preserving resale value. | Permanent. Reverting to a previous color requires another costly paint job. |
One of the most compelling reasons to choose vinyl wrapping auto is its reversibility. The wrap protects your car’s original paint, which is invaluable for resale value. When you’re ready for a change, the wrap peels off cleanly. For more insights, visit our page on Wrap Instead of Paint.
Exploring the Finishes and Effects
The world of vinyl wrapping auto offers a universe of possibilities that are difficult or expensive to achieve with paint.
- Gloss finishes provide a classic, mirror-like shine.
- Matte finishes absorb light for a sophisticated, non-reflective appearance.
- Satin finishes offer a low-sheen, silky smooth look that’s between gloss and matte.
- Chrome wraps deliver an ultra-reflective, mirror-like metallic finish.
- Carbon fiber wraps replicate the woven pattern of the high-tech material, adding a sporty edge.
- Color-flip wraps (or chameleon wraps) create dramatic color shifts depending on the viewing angle and light.
- Metallic finishes incorporate tiny flakes that shimmer in the light, adding depth and luxury.
- Textured finishes can mimic brushed metal, leather, or even wood grain for unique effects.
The color options within each category are nearly endless. From timeless blacks and whites to vibrant reds and electric blues, you’re only limited by your imagination. Our partners at 3M offer an incredible spectrum—you can View the 3M™ Wrap Film Series 2080 color options to get inspired. These options make truly Custom Car Wraps possible.
The DIY Vinyl Wrapping Auto Process: Preparation is Everything
A successful DIY vinyl wrapping auto project depends almost entirely on preparation. The difference between a homemade look and a professional finish is determined before you ever apply the film. Every speck of dust, bit of residue, and surface imperfection will be visible under the vinyl.
First, your workspace must be a clean, dust-free, and temperature-controlled environment. A thoroughly swept garage is ideal. Even a gentle breeze can carry dust particles that create bumps under the vinyl.
Temperature is also critical. The ideal temperature is around 68°F (20°C) for both your vehicle and the vinyl. If it’s too cold, the vinyl becomes stiff and brittle. If it’s too hot, the adhesive becomes overly aggressive and difficult to reposition, and the film can overstretch.
Good lighting is essential to see every detail, air bubble, and potential imperfection. Before you begin, inspect your car’s surface for chips, dents, deep scratches, or rust. Vinyl wrapping auto will not hide body damage; in fact, it often makes imperfections more visible. Any damage must be repaired with proper bodywork before you wrap. Vinyl will not bond properly to peeling paint, heavily textured surfaces, or certain types of plastic. The original paint must be in good, solid condition.
For more detailed guidance on our professional methods, you can visit our page on More on our Vinyl Wrap Installation process.

Essential Tools and Materials for the Job
Having the right tools is non-negotiable. Here’s what you’ll need:
- Vinyl Wrap Roll: Ensure you have enough material (an average sedan needs a 25-foot roll of 60-inch wide vinyl).
- Heat Gun: Essential for making the vinyl pliable and activating the adhesive.
- Infrared Thermometer: To monitor temperature and avoid overheating the material.
- Squeegees with felt edges: To smooth the material without scratching it.
- Knifeless Tape: For making precise cuts without using a blade on your car’s paint.
- Isopropyl Alcohol (IPA): A 70% solution for final surface cleaning.
- Microfiber Cloths: High-quality, lint-free cloths are a must.
- Precision Cutting Blade: A sharp utility knife with fresh blades for trimming.
- Application Gloves: To keep fingerprints and oils off the adhesive.
- Measuring Tape: For accurately sizing panels.
- Grease and Wax Remover: For the initial deep cleaning.
- Masking Tape: For temporarily positioning vinyl.
Preparing Your Vehicle for a Flawless Finish
This is where patience pays off. Every minute spent on preparation saves hours of frustration later.
- Thorough Washing: Start with a deep clean using a pH-neutral car shampoo to remove all surface dirt. Rinse thoroughly and dry completely with clean microfiber towels.
- Clay Bar Treatment: This crucial step removes embedded contaminants that washing misses, such as brake dust and road tar. Rub the clay bar over a lubricated surface until it feels glass-smooth.
- Address Paint Damage: Fill chips, smooth out deep scratches, and treat any rust spots. The vinyl will only be as smooth as the surface beneath it.
- Remove Obstacles: For a seamless, professional look, remove emblems, badges, door handles, and mirrors. Wrapping around these items is difficult and often yields inferior results.
- Final Wipe-Down: The last step before application is a complete wipe-down with 70% isopropyl alcohol. This removes any remaining oils or residues that could interfere with the adhesive. Let the surface air dry completely.
Only when your car is spotlessly clean, dry, and in a temperature-controlled environment are you ready to begin the application.
Mastering the Application: Techniques for a Professional Look
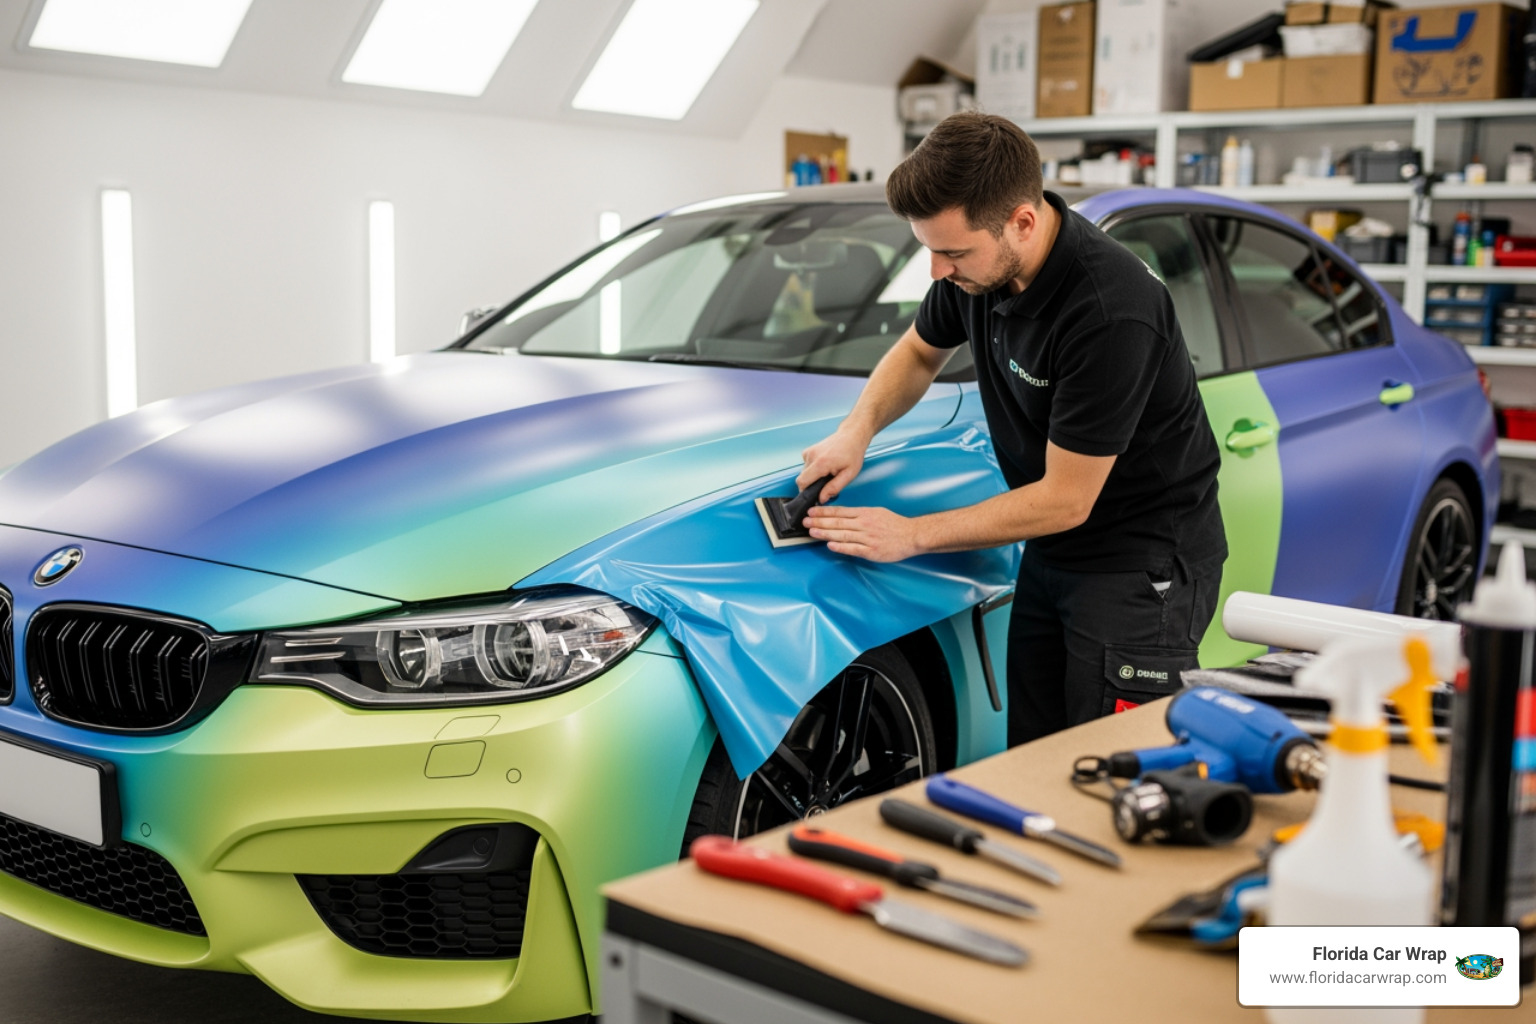
With your vehicle prepped, it’s time to apply the vinyl. This stage requires patience, precision, and a steady hand. Mastering a few core techniques is the key to a successful vinyl wrapping auto project.
Laying, Stretching, and Squeegeeing Your Vinyl
First, measure and cut your vinyl panels. Always cut the sheet with a few inches of overlap on all sides. This extra material provides room to maneuver and stretch without coming up short.
Next, use the “glassing” technique. As you peel the backing paper, keep even tension on the film to prevent it from sagging or sticking to itself. Position the vinyl over the panel, and once aligned, lightly tack down a central portion to anchor it.
Work from the center outwards using your felt-edged squeegee. Apply firm, overlapping strokes to push out air and ensure a smooth bond. The air-release channels in quality vinyl will help, but proper squeegee technique is crucial.
For curves and contours, use heat to stretch the vinyl. Gently warm the film with your heat gun (under 120°F / 50°C) to make it pliable. Carefully pull and stretch it to conform to the shape, but be careful not to overstretch, which can cause the vinyl to thin out and fail later.
For creating seams or cutting on the vehicle, knifeless tape is a game-changer. This tool uses a fine filament to cut the vinyl from underneath, leaving a clean edge without a blade ever touching your car’s paint.
For visual demonstrations of these techniques, Watch our Car Wrap Videos. For detailed manufacturer guidelines, you can View technical bulletins for application guidance.

Managing Bubbles, Wrinkles, and Edges in vinyl wrapping auto
Encountering bubbles or wrinkles is normal. Here’s how to manage them:
- Large Bubbles/Wrinkles: Gently lift the vinyl back to where the imperfection begins. Reheat the area slightly to relax the film, then re-squeegee it down slowly.
- Small Wrinkles: These can often be shrunk out with gentle heat. Apply heat to the wrinkle and then lightly squeegee over it.
- Tiny Air Bubbles: For stubborn bubbles, use a sharp pin to make a tiny puncture. Then, use your finger to push the trapped air out through the hole.
Once the main panel is wrapped, finish the edges. Trim the excess vinyl, leaving about a quarter-inch margin. Carefully tuck this margin into panel gaps or around the edges of the panel to create a clean, finished look.
The final, crucial step is post-heating the edges. Use your heat gun to heat all edges and the entire panel to at least 212°F (100°C). This fully activates the adhesive for a strong, long-lasting bond. Press firmly along the heated edges with a gloved finger or soft squeegee.
Allow at least 12 hours for the adhesive to fully cure before driving the vehicle.
Post-Wrap Care, Maintenance, and Removal
Your vinyl wrapping auto project is complete, but the work isn’t over. Proper care is essential to keep your wrap looking its best for years. A quality vinyl wrap can last five to seven years, and sometimes up to ten, but its lifespan depends on several factors.
- Material Quality: Premium vinyl from manufacturers like 3M lasts longer. That’s why we use top-tier materials for our 3M Certified Custom Wraps.
- Installation Quality: A meticulous installation prevents lifting and peeling.
- Climate Impact: Intense UV rays and heat, like we have in South Florida, can age vinyl. Parking in a garage or shaded area helps immensely.
- Maintenance Routine: Regular, proper cleaning will far outlast a neglected wrap.
For more on why wrapping is a smart choice, check out our page on Reasons to Wrap Your Car.
Extending the Life of Your vinyl wrapping auto
Follow these practical steps to maximize your investment:
- Allow Curing Time: Give the wrap 12 to 24 hours to cure before washing or driving it. The adhesive needs this time to fully bond.
- Hand Wash: This is the best method. Use a soft microfiber mitt and pH-neutral car wash soap. Avoid abrasive scrubbing. Rinse thoroughly and dry with a clean microfiber towel to prevent water spots.
- Automatic Car Washes: If you must use one, choose a touchless or brushless system only. The spinning brushes in traditional car washes can scratch, lift, or even tear the vinyl.
- Use Safe Products: Stick to cleaners specifically formulated for vinyl wraps or pH-neutral, wax-free automotive products. Always verify that any waxes or sealants are vinyl-safe before use.
- Add Protection: Consider vinyl-safe sealants or ceramic coatings designed for wraps. They add a protective barrier against UV damage and make cleaning easier.
The Safe Removal Process
One of the biggest advantages of vinyl wrapping auto is its reversibility. When done properly, removal is straightforward and leaves your original paint pristine.
- Heat the Vinyl: Use a heat gun set to around 120°F (50°C) to warm a section. This softens the adhesive and makes the vinyl pliable.
- Pull at a Low Angle: Find an edge and begin pulling the vinyl back over itself slowly and steadily at a low, sharp angle (15-20 degrees). This technique minimizes adhesive residue.
- Remove Residue: It’s normal for some adhesive to be left behind. Use an automotive-safe adhesive remover and a microfiber cloth to gently wipe it away.
After removal, your car’s original factory paint will be revealed, preserved just as it was before the wrap.

Frequently Asked Questions about Vinyl Car Wrapping
When considering vinyl wrapping auto, many people have the same questions. Here are answers to the most common concerns we hear from clients in Davie, Fort Lauderdale, and Miami.
Will a vinyl wrap damage my car’s factory paint?
No, when properly installed and removed, a high-quality vinyl wrap will not damage your car’s factory paint. In fact, it protects it. The vinyl film acts as a shield against UV damage, minor scratches, road debris, and environmental contaminants like bird droppings and tree sap.
When the wrap is removed, the original paint underneath is revealed in its preserved condition, which is a major benefit for your car’s resale value.
The important caveat is that the wrap is only as good as the surface it’s applied to. If your car already has a poor-quality paint job, rust, or peeling clear coat, the wrap may not adhere properly, and removing it could worsen these pre-existing issues. Vinyl wrapping auto is best suited for smooth, intact factory paints.
Can I take my wrapped car through an automatic car wash?
Hand washing is always the safest and most recommended method. Use a pH-neutral soap and a soft wash mitt.
If you must use an automatic wash, choose a touchless car wash. These rely on high-pressure water and detergents without any physical contact, so there’s no risk of brushes scratching or lifting the vinyl.
Absolutely avoid automatic car washes with rotating brushes. The bristles are aggressive and can scratch the vinyl, catch on edges, and cause significant damage.
If using a pressure washer, be cautious. Keep the nozzle at least 12 inches away, use a wide spray tip (40 degrees or more), keep the pressure under 2,000 PSI, and never aim directly at seams or edges.
How long will a quality vinyl wrap last?
A quality vinyl wrapping auto project should last between five to seven years with proper care. In some cases, premium materials can last up to ten years.
Several factors influence this lifespan:
- Material Quality: High-grade vinyl from reputable manufacturers like 3M is engineered for durability and UV resistance. We use these materials for our 3M Certified Custom Wraps.
- Installation Quality: A professional installation ensures the vinyl is properly adhered, post-heated, and trimmed to prevent lifting or peeling.
- Climate and Sun Exposure: Prolonged exposure to intense UV rays, especially in South Florida, can accelerate aging. Parking in a garage or shade whenever possible will dramatically extend the wrap’s life.
- Maintenance: A consistent and correct cleaning routine is crucial. Neglecting maintenance can lead to premature fading, cracking, or lifting.
A quality vinyl wrap is a durable, long-lasting investment that transforms your vehicle while protecting its original paint.
Conclusion: Your Journey’s End and a New Beginning
We’ve covered the essentials of vinyl wrapping auto, from understanding the materials to mastering the application and care. You now know about the endless customization options, the value of paint protection, and the freedom of reversibility.
Whether you’re a DIY enthusiast ready for a rewarding project or someone considering a professional installation, you have the knowledge to make an informed decision. While a DIY wrap can be satisfying, achieving a truly flawless, professional finish requires years of experience and specialized tools.
For those in South Florida—including Davie, Fort Lauderdale, and Miami—the best investment is often calling in the professionals. At Florida Car Wrap, our owner and founder, Steve Hargittai, brings over 20 years of experience to every project. He personally ensures clear communication and ongoing support from start to finish.
We stand behind our work with high-quality standards and a 100% client satisfaction guarantee. Our reputation is built on referrals from customers who trust us with their vehicles. If there’s ever an issue, you can count on us to make it right.
Ready to see what’s possible for your vehicle? Ready to transform your ride? Explore our gallery of Miami Car Wraps for inspiration! Whether you seek a bold statement or practical protection, we’re here to bring your vision to life.
This is just the beginning of an exciting new chapter for your vehicle.


