
Why and When to Remove Your Car’s PPF
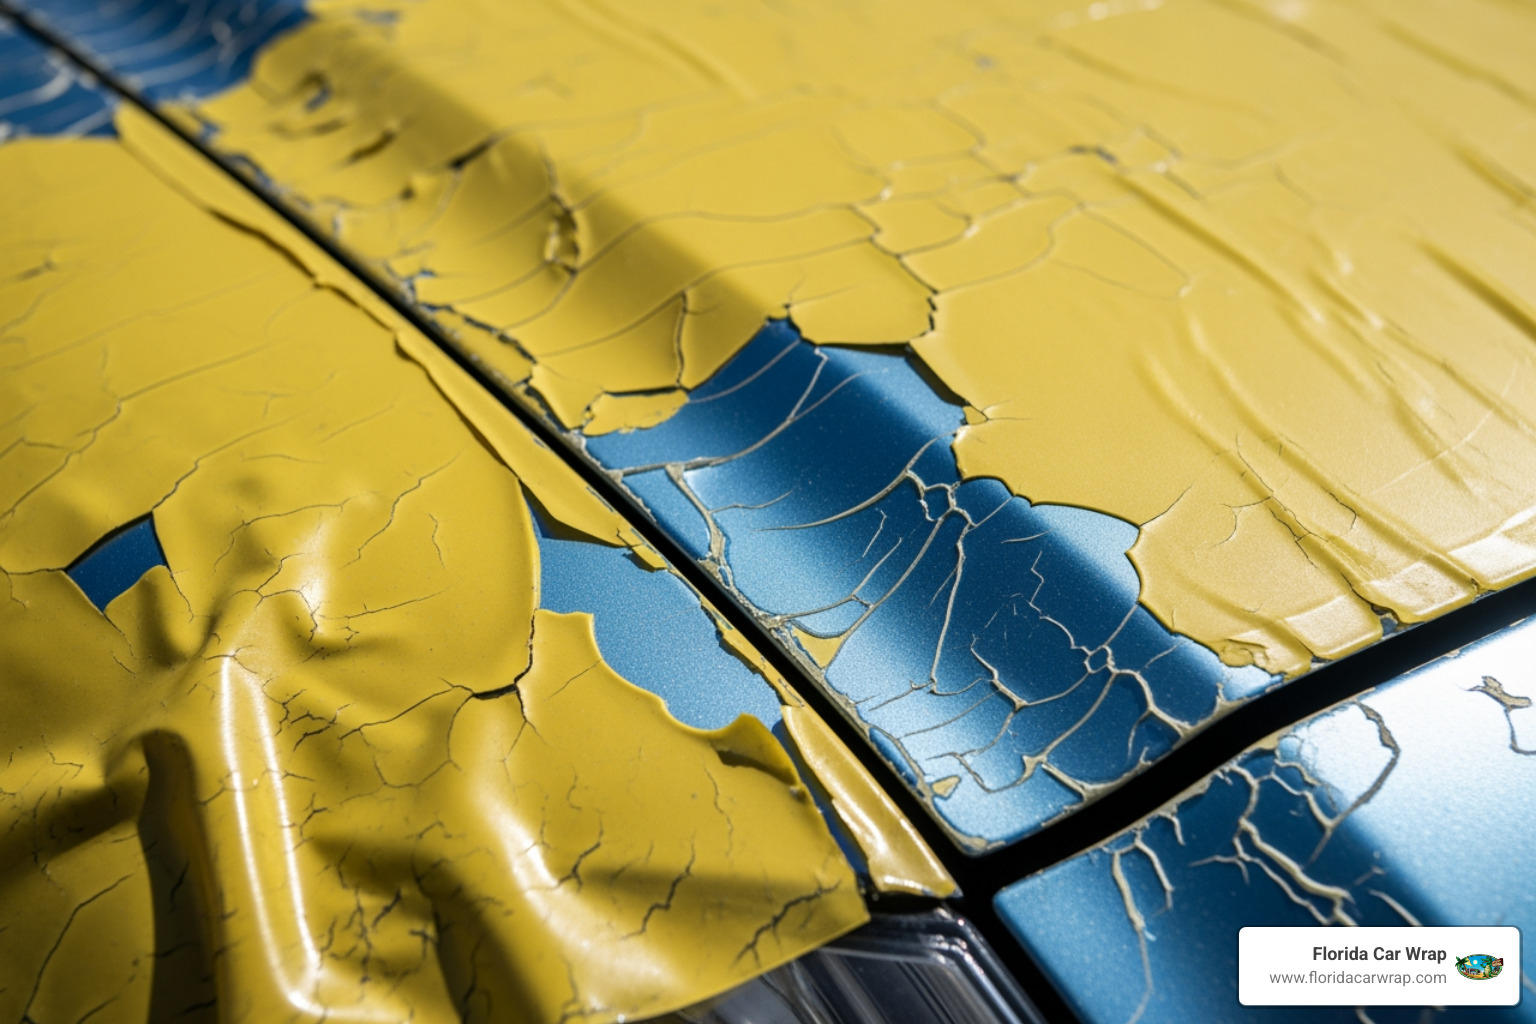
Learning how to remove paint protection film from your car doesn’t have to be a nightmare. While that PPF was once a hero, shielding your paint from rock chips and UV damage, after 5-10 years it can become the villain—yellowing, cracking, and peeling at the edges.
Here’s the quick answer for removing it:
- Heat the film with a steamer or heat gun to soften the adhesive.
- Peel slowly from a corner at a low angle (less than 45 degrees).
- Remove residue using an automotive adhesive remover.
- Clean thoroughly with car soap and inspect the surface.
Most PPF needs replacement after 5-10 years. When you see yellowing, cracking, lifting edges, or bubbling, it’s time. Old film doesn’t just look bad; it can trap dirt and moisture, causing more harm than good.
As one frustrated car owner put it: “The film would not peel off, just little pieces. I probably spent close to 6 hours on the bumper as you go little by little, then more steam.”
The good news? Removing PPF is easier than installing it. The challenge is doing it without damaging the pristine paint underneath, which requires the right tools, technique, and plenty of patience.

Gearing Up: Essential Tools and Materials for PPF Removal
Before you start, gather all your tools. There’s nothing more frustrating than getting halfway through peeling a bumper only to realize you’re missing the right adhesive remover. The good news is you don’t need a professional garage full of expensive equipment. Most of what you need for how to remove paint protection film safely is easy to find.

Here’s what you’ll want to gather:
- Heat Source: A steamer, heat gun, or hair dryer.
- Peeling Tools: Plastic razor blades, a plastic squeegee, and microfiber towels.
- Adhesive Removers: Automotive-grade adhesive remover or isopropyl alcohol (70%+).
- Cleaning Supplies: Car soap, a spray bottle, and extra microfiber towels.
Heat Sources
Heat is the secret to successful PPF removal. It softens the adhesive, making the film pliable and much easier to peel.
- Steamer: This is the professional’s favorite. It provides consistent, moist heat that penetrates the film without scorching the paint. As one experienced installer put it: “The best thing to pull off old film is a steamer. Hands down works wonders.” A basic clothes steamer is all you need.
- Heat Gun: A faster option, but it requires more skill. Use it on a low setting, keep it 6-8 inches from the surface, and never stop moving it to avoid damaging your clear coat.
- Hair Dryer/Hot Water: A standard hair dryer on low is a safer, albeit slower, alternative for small areas. You can also pour hot water over the film or use a hot, soaked towel to warm the adhesive. This method is very safe for beginners.
Peeling & Scraping Tools
Once the adhesive is warm, you need the right tools to lift the film without scratching your paint.
- Plastic razor blades are perfect for lifting a corner to get started.
- A plastic squeegee helps apply even pressure as you peel, preventing tears.
- Microfiber towels are essential for wiping away residue and cleaning solutions.
Adhesive & Residue Removers
Some sticky residue is almost guaranteed, especially with older film.
- Automotive-grade adhesive removers like 3M’s formula or Koch-Chemie’s E Eulex are designed to dissolve stubborn glue without harming paint. Always work in a well-ventilated area.
- Isopropyl alcohol (70% or higher) works well for lighter residue.
- For baked-on adhesive, a 3M pinstripe removal wheel (rubber eraser wheel) attached to a drill can erase the residue. Use it gently to avoid paint damage.
Warning: Never use brake cleaner on your paint. Its harsh solvents can permanently damage your car’s finish. When in doubt, test any product on an inconspicuous area first.
The Step-by-Step Guide on How to Remove Paint Protection Film
With your tools ready, it’s time to remove that old film. How to remove paint protection film requires a methodical approach and patience. Rush it, and you’ll make a mess. Take your time, and you’ll reveal the beautiful paint underneath.

Step 1: Preparation and Surface Cleaning
First, give your vehicle a thorough wash with automotive soap. Removing all dirt and grime is crucial to prevent scratching the paint with your tools. Once clean and dry, work in a shaded, well-lit area. Avoid direct sunlight, which can make the film and adhesive removers behave unpredictably.
Step 2: Applying Heat to Loosen the Adhesive
Heat is essential for softening the adhesive bond. Using your steamer or heat gun, warm the section you’re about to peel. If using a heat gun, set it to low, hold it 6-8 inches away, and keep it in constant motion. The goal is to warm the panel evenly, not cook the paint. A properly heated surface will peel smoothly.
Step 3: The Art of the Peel: How to Remove Paint Protection Film Safely
This is where patience pays off. Find a corner or edge to start, using a plastic razor blade to gently lift it if needed. Once you have a grip, pull slowly at a low angle (less than 45 degrees), keeping the film close to the surface. Pulling straight up can cause the film to tear or even lift the paint.
If you feel resistance, stop and re-apply heat. The adhesive has cooled and needs to be softened again. Work in small, manageable sections.
If you’re dealing with old, brittle film, expect it to come off in small pieces. As one owner shared, “The film would not peel off, just little pieces. I probably spent close to 6 hours on the bumper as you go little by little, then more steam.” This is normal for aged PPF. Keep heating and gently scraping with your plastic blade.
Step 4: Conquering Stubborn Adhesive Residue
With the film gone, it’s time to tackle the leftover adhesive. Apply an automotive-grade adhesive remover to a microfiber towel and gently rub the sticky areas. Let the solvent sit for a minute on stubborn spots to break down the glue.
For thicker patches, use your plastic razor blade at a shallow angle to gently scrape away the gunk after applying remover. Let the solvent do the work. If you encounter truly baked-on adhesive, a rubber eraser wheel on a drill can save the day, but use it carefully to avoid damaging the paint.
Continue wiping with clean microfiber towels until the surface is smooth. Never use brake cleaner on your paint.
After the Peel: Post-Removal Care and Inspection
Congratulations! The old film is off and the sticky residue is gone. Before you celebrate, there’s one final phase: post-removal care for your newly exposed paint.

Inspecting the Paint Surface
First, play detective. In good daylight, carefully examine the areas where the film used to be. Look for any minor scratches or spots where the clear coat looks different. If you used the gentle heating and low-angle peeling technique, damage is highly unlikely on a factory paint job.
You’ll likely notice the paint that was under the PPF looks newer and glossier than the exposed areas. This isn’t damage—it’s a sign the film did its job protecting the paint from the elements. Check for any faint adhesive blotches that may still be visible.
Cleaning and Restoring the Shine
Now for the satisfying part: bringing back that showroom sparkle.
Start with a final wash using automotive soap to remove any chemical residue. Once dry, assess the paint. If you see swirl marks or a noticeable difference in shine between protected and unprotected areas, a light polish can blend everything together for a uniform, glossy finish.
Next, apply a coat of wax or paint sealant. This crucial step shields your paint from UV rays and contaminants, giving it a fresh layer of protection.
With the paint clean and corrected, this is the perfect time to think about future protection. Many owners choose to apply new, high-quality PPF right away, while others opt for a ceramic coating. If you’re in South Florida and want a flawless finish or professional-grade protection, the team at Florida Car Wrap can help ensure your vehicle looks its absolute best.
DIY vs. Professional Removal: Knowing Your Limits
We’ve walked through how to remove PPF, but just because you can do something doesn’t always mean you should. Removing PPF is easier than installing it, but it’s not risk-free. A strong adhesive bond is great for protection but makes removal a delicate process.
DIYers have shared their real-world challenges, with one spending “close to six hours on a bumper” and another finding their film came off in “small pieces if it’s had years in the sun.” For more stories, you can Read about real-world DIY challenges.
Risks of DIY Removal
Attempting to remove PPF yourself can save money, but it comes with genuine risks:
- Paint Damage: While uncommon on factory paint, there’s always a small risk of paint lifting, especially with older film or on certain colors like white.
- Aftermarket Paint Jobs: Repainted surfaces are significantly more vulnerable to peeling or damage during removal due to potential curing or application issues.
- Stubborn Residue: Without proper heat and technique, you can be left with a thick layer of adhesive that takes hours of scrubbing to remove.
- Overheating: A heat gun held too close or for too long can burn your clear coat, leading to an expensive repair.
When to Call a Professional
Sometimes, the smartest move is to call in an expert. Consider professional help if:
- The film is extremely old or brittle (10+ years). It will likely shatter into tiny pieces, turning the job into a multi-day ordeal.
- The film immediately flakes when you start. This is a sign of aged, low-quality film that will be incredibly time-consuming to remove.
- You lack the time or tools. A pro can do the job efficiently, saving you a weekend of frustration.
- Your car has an aftermarket paint job. A professional can assess the risk and use the gentlest methods to protect your investment.
Professional removal typically costs between $500 and $2,000, depending on the vehicle and film condition. While that’s a significant amount, it can be far less than the cost of repainting a panel damaged during a DIY attempt.
At Florida Car Wrap, Steve Hargittai and the team have over 20 years of experience handling these exact situations. We can assess your vehicle and help you decide whether to tackle it yourself or let the pros handle it for a stress-free, guaranteed result.
Frequently Asked Questions about PPF Removal
When you’re staring at aging film on your car, a lot of questions come to mind. Here are the answers to the most common concerns.
Will removing PPF damage my car’s original paint?
Generally, no, provided you’re working on a factory paint job and use the proper technique. PPF is designed to be removed cleanly. The key to avoiding damage is using sufficient heat and pulling the film back on itself at a shallow angle (less than 45 degrees). The risk of pulling paint increases with very old, low-quality film or on aftermarket paint jobs.
How can I tell the difference between removing old vs. new PPF?
The age of the film completely changes the removal experience. After 5-10 years, PPF becomes brittle and loses its elasticity.
- Newer Film (1-5 years) is typically pliable and peels off in large, satisfying pieces with minimal adhesive residue. The process is relatively quick and straightforward.
- Old Film (5-10+ years) is a different beast. It becomes brittle from sun exposure and will likely come off in frustratingly small pieces. As one owner noted, “The film would not peel off, just little pieces.” Expect to spend much more time and effort removing the film and the stubborn, baked-on adhesive it leaves behind.
What is the best method for how to remove paint protection film: heat gun or steamer?
Professionals overwhelmingly agree: a steamer is the best tool for the job.
A steamer provides consistent, moist heat that softens the adhesive safely without any risk of overheating or scorching your paint. It makes the film easier to peel in large sections and reduces the amount of residue left behind. As one pro put it, a steamer “Hands down works wonders.”
A heat gun is faster and also effective, but it requires more skill. You must keep it moving at a safe distance (6-8 inches) to avoid burning the clear coat. For beginners, a steamer is the safer, more forgiving option for protecting your vehicle’s finish.
Conclusion: Revealing Your Car’s Flawless Finish
By now, you know that how to remove paint protection film is a manageable task. It requires patience, the right tools, and a bit of elbow grease, but the reward is revealing that pristine paint hiding underneath.
Remember the key takeaways: patience is your greatest ally, especially with old film. Proper tools like a steamer and automotive-grade adhesive remover are essential to prevent damage. When you finally peel away that last piece, you’re left with paint that looks as fresh as the day it was protected.
Of course, if you’re facing extremely brittle film or simply lack the time, there’s no shame in calling for backup. Professional removal services exist for a reason, and the peace of mind is often worth the cost.
Once the old film is gone, you have the perfect opportunity to apply fresh protection. At Florida Car Wrap, we specialize in vehicle customization and protection. Owner Steve Hargittai brings over 20 years of experience to every project, ensuring high-quality results and 100% client satisfaction from start to finish. We serve Davie, Fort Lauderdale, Miami, and all of South Florida with clear communication and ongoing support.
Explore our expert car wrap and PPF services in South Florida.


