
Why Boat Wrapping is the Smart Choice for Florida Vessel Owners
How to wrap boat surfaces has become a popular question among boat owners seeking an affordable, durable alternative to traditional marine paint. Whether you want to change your boat’s color, add custom graphics, or protect the hull from harsh marine elements, vinyl wrapping offers a professional solution that costs significantly less and takes far less time than conventional refinishing.
Quick Answer: How to Wrap a Boat
- Choose marine-grade vinyl – Select UV-resistant, water-resistant vinyl designed specifically for marine use
- Prepare the surface – Thoroughly clean and decontaminate the hull, removing all wax, dirt, and contaminants
- Gather professional tools – Heat gun, squeegees, knifeless tape, and precision cutting tools
- Apply the vinyl – Carefully lay panels, use heat to conform to curves, remove air bubbles with squeegees
- Trim and finish – Cut around fittings and edges for a clean, professional appearance
According to research, a vinyl wrapped hull typically costs half the price of professional marine paint and can be completed in one-third to one-quarter the time. The results? A durable finish that lasts 5 to 7+ years with proper care, protects against UV rays and minor abrasions, and can be removed without damaging the underlying surface.
But here’s the reality: while DIY boat wrapping is technically possible, achieving a flawless, professional finish on a boat’s complex curves and contours requires extreme precision, specialized skills, and the right equipment. As one industry expert notes, “Trying it yourself without proper tools or experience could harm the wrap’s lifespan and compromise its visual appeal.”
In this guide, we’ll walk you through the professional boat wrapping process, explain when to tackle it yourself versus hiring experts, and share the tips that ensure a stunning, long-lasting finish for your vessel.

Why Choose a Vinyl Wrap for Your Boat?
If you own a boat in Florida, you know the sun and salt don’t play favorites. They’ll fade, crack, and wear down your vessel’s finish faster than you can say “another beautiful day on the water.” That’s exactly why more and more boat owners are turning to vinyl wrapping—it’s like giving your boat a suit of armor that also happens to look incredible.
Let’s talk money first, because who doesn’t love saving it? A vinyl-wrapped hull typically costs about half the price of a professional marine paint job—sometimes even less, dropping to as little as a third of the cost. That’s not just pocket change; that’s a significant chunk of your boating budget you can put toward fuel, gear, or that fishing trip you’ve been planning. The savings come from dramatically reduced labor hours and materials, which means more money stays in your wallet where it belongs.
Here’s another win: your boat spends far less time out of the water. While a traditional paint job can keep your vessel on dry land for weeks, vinyl wrapping typically takes one-third the time, and in some cases as little as one-quarter of the downtime required for prep and paint. For Florida boat owners who want to maximize their time on those gorgeous waterways, this is huge. Your boat is back where it belongs—cutting through waves—while other boats are still sitting in the shop.
But what about durability and protection? Marine-grade vinyl wraps are engineered specifically for the harsh realities of life on the water. They shield your hull from UV rays that would otherwise fade and damage your boat’s finish, and they provide excellent scratch resistance against minor bumps, dings from pilings, and other small abrasions that are just part of boating life. The vinyl creates a protective barrier that’s also easy to clean, which means you can spend less time waxing and polishing and more time actually using your boat.
With proper care, these wraps deliver an impressive 5 to 7 year lifespan, with some even pushing past a decade. And here’s the kicker: vinyl wraps are generally more resistant to fading than traditional paint, so your boat keeps looking sharp year after year. Understanding how to wrap boat surfaces properly is key to achieving this longevity, which is why professional installation makes such a difference.
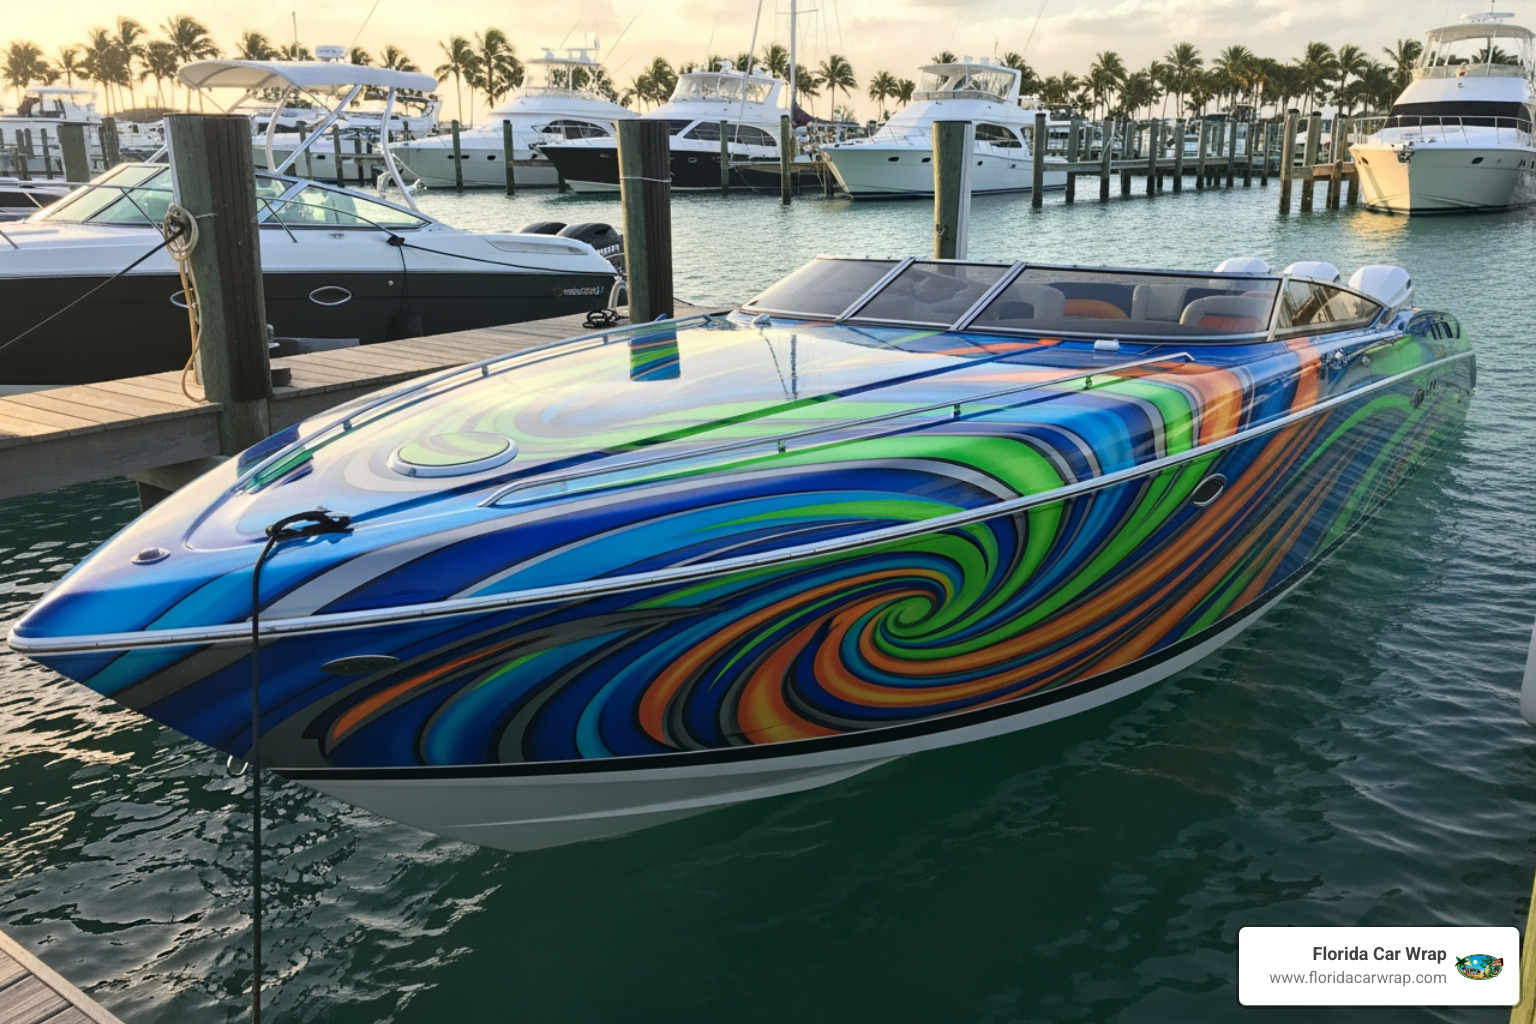
The customization options are where vinyl wrapping really shines. Want to change your boat’s color completely? Done. Looking to add custom graphics or bold branding for your charter business? No problem. Vinyl wraps come in hundreds of colors and finishes—gloss, matte, satin, metallic, and even specialty textures. You can create a sleek, modern look, go bold with eye-catching graphics, or design something completely unique that turns heads at every marina.
Finally, there’s the resale value factor. Unlike paint, which permanently alters your boat, vinyl wraps can be removed without damaging the underlying gelcoat. This gives you incredible flexibility: you can either sell your boat with its striking custom wrap to appeal to buyers who love the look, or remove it to reveal the pristine original finish underneath. Either way, you’re protecting your investment and keeping your options open for the future.
Whether you’re looking for aesthetic improvement, serious protection, or both, vinyl wrapping delivers on every front. It’s the smart choice for Florida boat owners who want their vessels to look great and stay protected without breaking the bank.
How to Wrap a Boat with Vinyl: A Professional’s Guide
Changing your boat with a vibrant vinyl wrap isn’t just about changing its look; it’s about giving it a new lease on life, all while protecting its valuable hull. At Florida Car Wrap, we see it as an art form that blends precision, skill, and the very best materials. We’re here to show you the professional process for how to wrap boat surfaces with vinyl, ensuring a finish that truly stands out on the water.

Choosing the Right Marine-Grade Vinyl
The secret to a stunning and long-lasting boat wrap starts with the vinyl itself. In Florida’s sunny, salty environment, not just any vinyl will do! That’s why we always insist on premium, marine-grade vinyl that’s been specifically engineered to handle the harsh conditions boats face. Think of it like choosing the right sunscreen for a day out on the Miami coast – you need something strong and reliable! We often choose top-quality materials like 3M 1080/2080 vinyl for the exterior, known for its incredible durability. And if you’re looking to refresh your interior, we might suggest 3M DI-NOC Architectural Finishes, which can mimic everything from neat wood grain to sleek metal and even unique textile textures.
When you’re picking out your boat’s new skin, here’s what we help you consider:
- Finish Choices: Do you dream of a shimmering Gloss, a sophisticated Matte, or perhaps a smooth Satin? The options are endless, including cool specialty textures and reflective designs. We’ll chat about what looks best and what suits your boat’s adventures—whether that’s a camouflaged fishing boat or a head-turning cruiser for Fort Lauderdale.
- Color Selection: With hundreds of colors and shades at our fingertips, the possibilities for customization are vast! We’ll guide you through them to find that perfect hue that truly captures your vision.
- UV Resistance: This is absolutely critical for Florida’s intense sun. Our marine-grade vinyl comes packed with built-in UV inhibitors. This means your boat’s vibrant new color will resist fading and look fantastic much longer than traditional paint might.
- Durability Factors: We carefully match the vinyl to your boat’s needs, making sure it offers top-notch resistance against saltwater, minor bumps, and those pesky little abrasions.
Step 1: Meticulous Surface Preparation for how to wrap a boat
This step is the foundation of everything. Think of it like preparing a canvas before painting a masterpiece – any shortcuts here, and the final result just won’t be as perfect. For a full hull wrap, your boat will need to spend a little time out of the water. We always make sure the application happens in a super clean, dust-free environment. Why? Because even tiny dust particles can mess with the vinyl’s adhesion, leading to a shorter lifespan for your beautiful new wrap.
Our preparation process is incredibly thorough and includes:
- Thorough Cleaning: First, we make sure your boat’s exterior is sparkling clean, as if it just rolled off the showroom floor. We carefully remove all dirt, grime, algae, and any other contaminants. Dust is the enemy here!
- Decontamination: We go beyond just cleaning. We carefully remove every trace of old wax, polish, and silicone. These substances can be sneaky and prevent the vinyl from sticking properly. We use only cleaning supplies recommended by boat manufacturers to get that surface perfectly prepped.
- Hardware Removal: For a truly seamless look, we carefully remove any removable hardware like cleats, rails, and emblems. Don’t worry, they’ll go right back on perfectly!
- Filling and Smoothing: If your boat has any chips, scratches, or imperfections in the gelcoat, we’ll fill them and sand them smooth. Why? Because the vinyl wrap will conform to the surface underneath it, so a perfectly smooth foundation is absolutely essential for that professional, flawless finish.
Step 2: The Application Process for a Flawless Finish
With your boat’s surface perfectly prepped and the ideal marine-grade vinyl chosen, it’s time for the magic to happen! This is where our expertise and specialized tools truly shine, as we bring your vision to life.
Here’s a list of essential tools we use to get the job done right:
- Vinyl Wrap: Of course, the star of the show – your chosen marine-grade film!
- Squeegees: Various shapes and sizes to expertly press the vinyl and smooth out any air.
- Heat Gun: Our secret weapon for making the vinyl flexible, allowing it to hug every curve and contour of your boat.
- Knifeless Tape: A clever tool that lets us cut the vinyl with incredible precision without ever touching a blade to your boat’s precious surface.
- Cutting Blades/Scalpels: For precise trimming around edges and fittings, ensuring a crisp finish.
- Measuring Tape: For careful planning and exact placement.
- Cleaning Supplies: We keep these handy to ensure the surface stays immaculate throughout the entire process.

Our application process is a careful dance of skill and technique:
- Planning and Positioning: We start by carefully planning how the wrap will fit your boat’s unique dimensions. This involves carefully laying out the vinyl panels. For larger hulls, we strategically place seams so they’re almost invisible, especially once your boat is cruising through the water.
- Laying Vinyl Panels: Next, we carefully apply long strips of vinyl. This requires extreme precision, as we steer around tricky areas like curves, hull windows, and spray rails. The special low-tack adhesive on our vinyl allows us to reposition it as needed, guaranteeing perfect alignment every time.
- Squeegee Techniques: Using our professional squeegees, we gently yet firmly press the vinyl onto the surface. We work outwards, pushing out any trapped air and ensuring a smooth, bubble-free adhesion. Many marine wraps even feature smart air channels that make releasing those pesky air bubbles much easier!
- Using Heat for Curves: A heat gun is absolutely essential when applying vinyl to a boat’s many complex, curved surfaces. It makes the vinyl wonderfully flexible, allowing it to stretch and conform perfectly without any wrinkles. We maintain expert control over the vinyl throughout, ensuring a smooth, uniform finish that looks factory-applied.
- Trimming and Finishing: Once the main panels are perfectly in place, we move on to the fine details. We carefully trim the edges and cut around all fittings, creating a clean, factory-like appearance. Some marine wraps benefit from a special primer at the edges to boost adhesion, and we might even use clear tape over edges temporarily until the adhesive fully sets. Every single edge is sealed and secure, ready to withstand the rigors of the marine environment.
This entire process is quite painstaking, often requiring multiple skilled hands for ultimate accuracy. But trust us, the result is well worth it! You get a stunning, durable finish that protects your boat and will have heads turning across Fort Lauderdale, Miami, and Davie.
Beyond Aesthetics: Understanding Boat Shrink Wrapping
While those vibrant vinyl wraps are fantastic for giving your boat a fresh, eye-catching look and protecting its surface from the daily grind of the water, there’s another kind of “wrapping” that’s all about serious safeguarding: shrink wrapping. This method is less about turning heads on the water and more about tucking your beloved vessel into a cozy, protective cocoon when it’s time for storage or transport. Think of it as a heavy-duty, custom-fit winter coat for your boat, built to brave the elements.
How Shrink Wrapping Protects Your Boat
So, what makes shrink wrapping such a superhero for your boat? Unlike flimsy tarps or loose-fitting covers that flap in the wind and can even chafe your boat’s finish, a shrink wrap creates a “drum-tight” seal. This means no flapping, no chafing, and certainly no impromptu kite-flying during a gusty day or a highway trip. This snug fit is a game-changer, keeping out all the nasties: cold air, moisture, snow, ice, rain, harmful UV rays, and even pesky debris. For us here in Florida, that tight seal is invaluable for preventing the dreaded mold and mildew that love our humid climate, and it stops structural damage that can happen with less adequate covers. Your boat stays cleaner, drier, and much happier.
Essential Steps for Preparing a Boat for Shrink Wrap
Before we even think about rolling out the shrink wrap, a little preparation goes a long way. This is a crucial step to ensure your boat emerges from its wrapped slumber looking just as pristine as when it went in.
First things first, a thorough cleaning and draining is a must. We clean every nook and cranny, inside and out. Anything that could attract unwanted critter guests (like trash or food crumbs) needs to go. All fuel lines should be drained, and fuel vents sealed with shrink wrap tape – safety first! Don’t forget to turn off all electronics and disconnect the battery.
Next, we focus on padding sharp objects. Your boat, especially the engine, might have some sharp corners or protrusions. We treat these like delicate treasures, cushioning them with foam or towels, securing them tightly with tape. This prevents the shrink wrap from tearing during application or, worse, when it tightens up.
Finally, especially here in high-humidity Florida, ventilation prep is super important. We make sure the boat is as dry as possible before wrapping, and we plan for vent installation. This helps prevent moisture buildup and keeps mold and mildew from throwing an unwelcome party inside your boat while it’s stored.
Building a Frame or Support Structure
A sturdy framework is the unsung hero of a good shrink wrap. It’s what gives the wrap its shape, allowing rain and any rare Florida snow (you never know!) to shed right off, rather than pooling and creating stress points.
We start by installing support posts along the center of the boat, usually one for every eight feet of length. These posts stand about a foot taller than the boat’s highest point and are topped with foam cushions – little pillows to protect the wrap from rubbing.
Then, we secure these support posts with polyester straps, anchoring them to grab rails or cleats. We run additional straps from bow to stern, crisscrossing over the support beams, and even diagonally in an “X” pattern from cleat to opposite corner. This creates a super strong “spiderweb” of support.
Finally, we build a perimeter band using rope or woven strapping around the hull, typically right at the waterline. This band acts like a solid anchor, giving the bottom edge of the shrink wrap something firm to hold onto, ensuring a tight fit and preventing it from riding up.
Techniques and Tools for Applying and Heating Shrink Wrap
Now for the fun part: applying the wrap! This requires a few special tools and a good eye for detail.
You’ll need specialized marine shrink wrap, along with all those support posts and straps we just talked about. Don’t forget padding, shrink wrap tape, and for safety, a dust mask and heat-resistant gloves. You’ll also need adhesive vents, a trusty ladder, propane, and the star of the show: a heat tool, also known as a propane gas hot air gun. Many of these items can be found conveniently in shrink wrap kits.
The process starts with draping the wrap. We carefully measure the boat’s height and length, adding an extra 1 to 1.5 feet to each measurement to ensure enough material for that crucial perimeter band. Then, we gently drape the shrink wrap over the boat, making sure there’s plenty of overhang to tuck around the perimeter band.
Next, we begin welding and securing. Using the heat tool, we “weld” the shrink wrap to itself around the perimeter band, creating a deep, secure seal. Then, we tie “belly bands” every 6-8 inches along the shrink wrap, about 8 inches below the rub rail. This keeps everything taut and helps create that amazing, snug seal.
Finally, it’s time for heating the wrap. With the heat tool in hand, we work from the back to the front of the boat, moving the heat gun continuously in a gentle, spray-painting motion. This is where the magic happens – the wrap shrinks, tightening snugly around the boat. It’s important to keep the heat gun about 6 inches from the wrap and never hold it in one spot, as we’re shrinking, not melting! As we go, we use a gloved hand to flatten out any wrinkles, ensuring a perfectly smooth finish.
Addressing Seams, Edges, and Weak Points
Even with the most careful application, some boats are just too wide for a single piece of shrink wrap. If your boat is wider than about 16 meters, you might need to apply shrink wrap in strips, which means creating heat-welded joins (seams). While possible, this can be a bit tricky and might affect the final look. For most boats, a single piece is ideal.
We also pay special attention to weak points, like areas around the frame or any remaining protrusions. We reinforce these spots with shrink wrap tape. If a tiny hole somehow appears, a quick patch with shrink wrap tape usually does the trick. For bigger boo-boos, a heat-welded patch might be needed.
Best Practices for Finishing a Shrink-Wrapped Boat
The final touches are all about ensuring long-term protection and making your boat accessible if needed.
For our Florida boats, air vents are absolutely crucial to prevent moisture buildup and the dreaded mold and mildew. We install adhesive vents around the top and sides of the boat – typically 4-6 for an average vessel, more for larger ones. We cut openings and cap them, creating a vital air circulation system for your boat. It’s like giving your boat a little breathing room!
If you need to check on your boat while it’s in storage, don’t worry! Access doors with zippers can be taped onto the cover after it’s been heat-shrunk. This allows you to pop in without compromising the protective seal.
Safety Precautions for Shrink Wrapping
Working with heat tools and large materials means safety should always be top of mind.
- Ventilation: When shrink wrap is heated, it releases some chemicals, so always work in a well-ventilated area. A respirator or dust mask is a smart idea.
- Fire Safety: Shrink wrap is flammable if it gets too hot. Always have a fire extinguisher close by and keep that heat gun moving! We always drain fuel lines and seal vents before starting, which is super important to prevent any ignition of fuel vapors.
- Personal Protection: Always wear heat-resistant gloves when you’re using a heat gun. And if you’re reaching for high areas, use a stable ladder or extension – no overreaching!
DIY vs. Professional Shrink Wrapping
While some adventurous boat owners might attempt to how to wrap boat for storage themselves, professional installation really is recommended, especially in Florida’s challenging climate. Professionals like us at Florida Car Wrap have the specialized tools, the experience, and the know-how to ensure a tight, secure fit that truly stands up to the elements. We can guarantee our work, which minimizes the risk of damage or an ineffective wrap. And trust us, if the weather forecast calls for even 10 mph winds (or stronger) on application day, attempting to pull that wrap over your boat yourself is a recipe for disaster – it acts like a giant sail! That’s just one of many reasons why leaving this task to the pros often saves you headaches (and potentially money) in the long run.
Environmental Considerations for Shrink Wrapping
For boats stored in Florida, we can’t stress enough how important proper ventilation (those vents!) is to prevent mold and mildew. When it comes to the shrink wrap material itself, modern options like Rhino Shrink Wrap are often 100% recyclable. After removal, it can be cut off, compressed into polythene bin bags, and disposed of through local recycling agents, as long as it’s not contaminated. It’s a great way to protect your boat and be kind to our beautiful Florida environment!
Comparing Your Options
When considering how to wrap boat surfaces, you essentially have three main paths: traditional painting, vinyl wrapping, and shrink wrapping. Each serves different purposes and comes with its own set of considerations.
| Feature | Vinyl Wrap “`


